Configuration:
I can't download the configurator.
Ensure that you follow the instructions for your operating system, either Windows or Mac.
Please download using the provided links to ensure the software is compatible with RubiQ.
I'm unable to connect to the configurator.
I'm having trouble binding my Taranis radio to RubiQ .
The channel bars in the RX tab don't respond to the radio commands.
I'm receiving radio inputs but the Channel Mapping is off
The flight modes aren’t configured or aren’t visible in the Modes tab
RubiQ's LEDs are malfunctioning
First, revisit Step 5 of the Configuration Guide. Troubleshooting steps can be found at the bottom of the page.
Educators, if your PCB continues to malfunction, contact us and we’ll help get you back in the air.
I'm attempting to verify motor rotation and the motors won’t spin
Motor rotation doesn’t match the diagram
The Accelerometer is not calibrated
The Compass is not calibrated
Head to the Pre-Flight Check step to learn how to calibrate RubiQ’s compass.
Pre-arming check does not show that Navigation is safe
What can go wrong while calibrating the ESC's?
Looking to use an Xbox controller with your Mac?
Airborne:
Have you completed configuration?
RubiQ cannot be armed or fly unless you have fully completed the configuration process.
The drone is not responding to radio controls
If the beeper beeps, then RubiQ is bound but not Arming.
- Be sure the master/main radio controller has switches in the correct position for Return to Home, Angle Mode, etc.
- Verify the channel mapping using Step 3 of the configuration guide.
If the beeper doesn’t beep, then:
- A.) The drone and radio need to be bound. Head back to Step 1 of the configuration guide.
- B.) The drone or radio batteries are low or dead. The batteries need to be fully charged prior to flight.
- C.) The radio switches may not have been configured. Revisit Steps 2-4 of the Configuration Guide and the included troubleshooting steps.
The drone won’t arm
Since GPS Lock is enabled, Rubi will not arm unless she’s connected to 7 or more satellites and has obtained 3D lock. Because satellite signals are blocked inside, the drone won’t be able to arm until you go outside.
Make sure both Position Hold and Return to Home are deactivated, since either one will prevent RubiQ from arming.

Make sure both the Compass and Accelerometer are calibrated. Connect to the configurator and review the Pre-Arming Checks in the Setup tab.
At the end of a successful Configuration, these pre-arming checks will have all categories showing a green check mark except for “Navigation is safe.”
The goggles are not receiving video feed
Make sure the camera is plugged into the PCB. Please note that the black wire (ground/GND) is positioned towards the inside of the RubiQ chassis as shown in the picture below.
Be sure the goggles are connected correctly to the power source and that they are charged. Some versions of Discover Drones come with goggles that use an external battery. Please be sure to check the amount of power in the battery before flight by using the included battery charger. For goggles with an internal battery, you may check the amount of power by turning them on and looking for the battery symbol in the upper right corner of the screen.
Post-Flight:
The drone crashed
Disarm the drone, then perform a post-flight inspection.
- Check the LED’s for any warning messages, then disconnect the battery. Inspect the LiPo battery for any serious physical damage, such as punctures or puffiness, which would require replacing the battery.
- Remove all props and check for any that are bent, nicked or broken. These will need to be replaced before the next flight.
- Check that all exposed wires are intact. If any have been nicked, wrap them with electrical tape and order replacement parts.
- With the hex driver, confirm that screws are still firmly attached and tighten any that feel loose.
- Inspect RubiQ’s other physical components, including:
- Arms, PDB, Frame and Camera Mount: Look for cracks or other signs of a hard impact.
- Camera, VTX Antenna and VTX: make sure the SMA connection to the antenna is still snug, that the VTX is still connected and fully seated and with the props still removed, plug in the battery to make sure the FPV goggles are still receiving video feed from the camera.
- Motors: with the props still removed, slowly spin the motors using the radio controller or the Master Control in INAV’s Motor tab. Use your hand to gently feel for any free spinning motors. There should be no rough spots or squeals.
- Charge the batteries and securely re-attach props and batteries before next flight.
Replacement parts can be purchased from the PCS Edventures website.
The drone flies erratically
Recalibrate the gyro sensor by setting the drone on a flatter surface and plugging the battery in again.
Check the prop orientation.
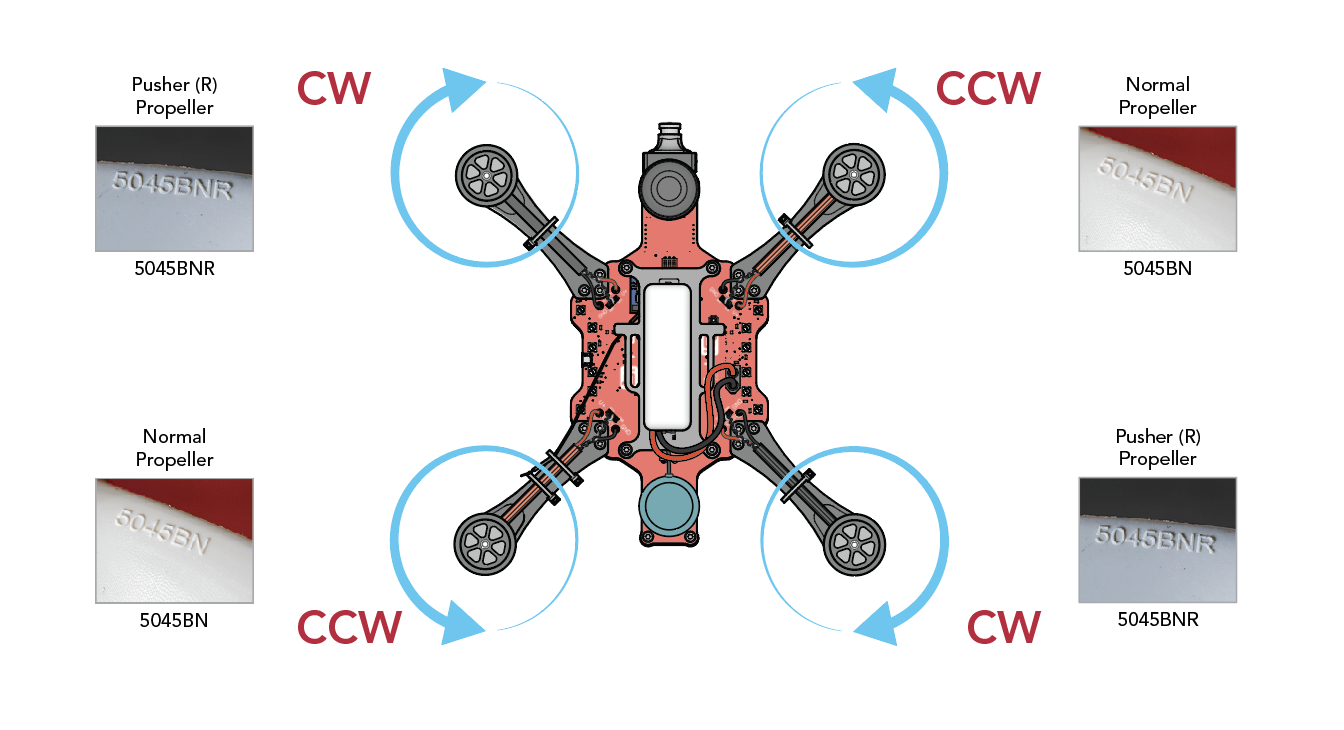
Check the motor/ESC orientation in Step 6 of the Configuration Guide.
Check all screws and make sure the hardware is tight on each arm.
Recalibrate the accelerometer using Step 8 of the Configuration Guide.
Check the magnetic declination using Step 9 of the Configuration Guide.
Inspect the motors for nicks or severed wires and replace if needed.
The drone descends in a spiral when it returns to home
Beeps:
3D-Lock
Depending on the conditions, it may take several minutes to achieve 3D-lock.
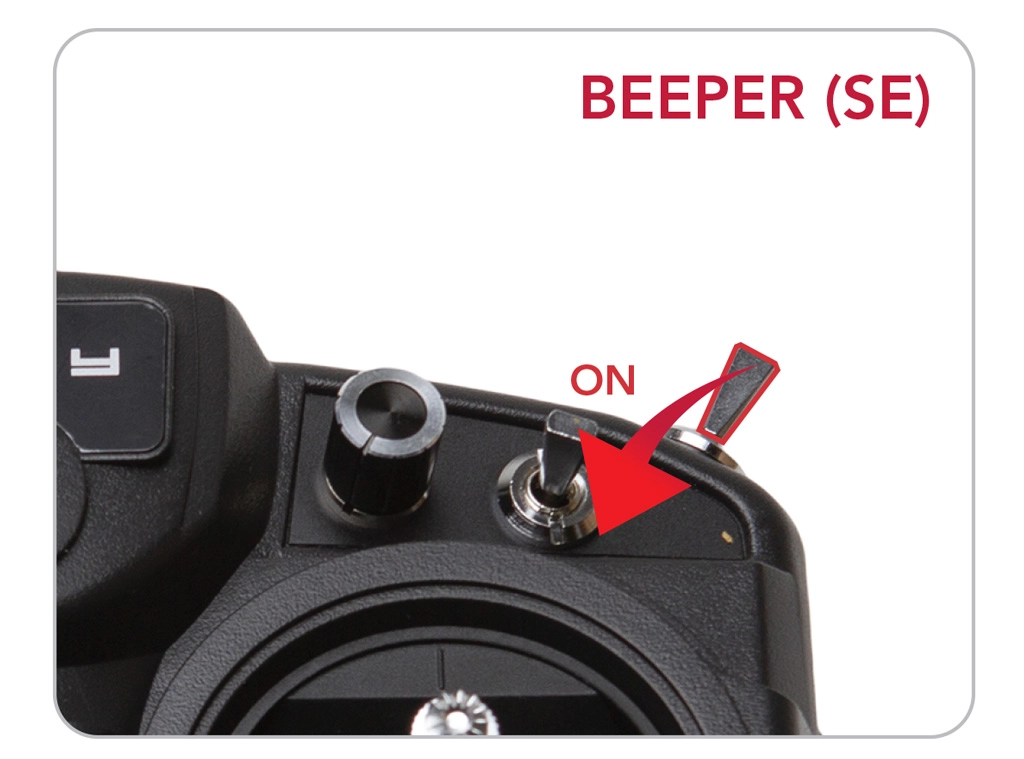
Beeper
Critical Component Failure
To narrow down your issue, connect RubiQ to the configurator and review the hardware component bar at the top of the page.
If your GPS icon shows red, the issue will generally resolve itself after the battery has been disconnected. If any of the other icons show red, there is likely an issue with the flight controller.
Educators, if the problem persists after reconnecting the battery, please contact us for further assistance.
Disconnected the Battery While Connected via USB
ESC Calibration
Inactivity
Lost Connection to Radio
Low Battery
Listen for the steady beep and look for your warning LEDs to flash red.
Start-up & Gyro Calibration
The tone heard at the end of the GPS search indicates 3D Lock has been established.
Blinks:
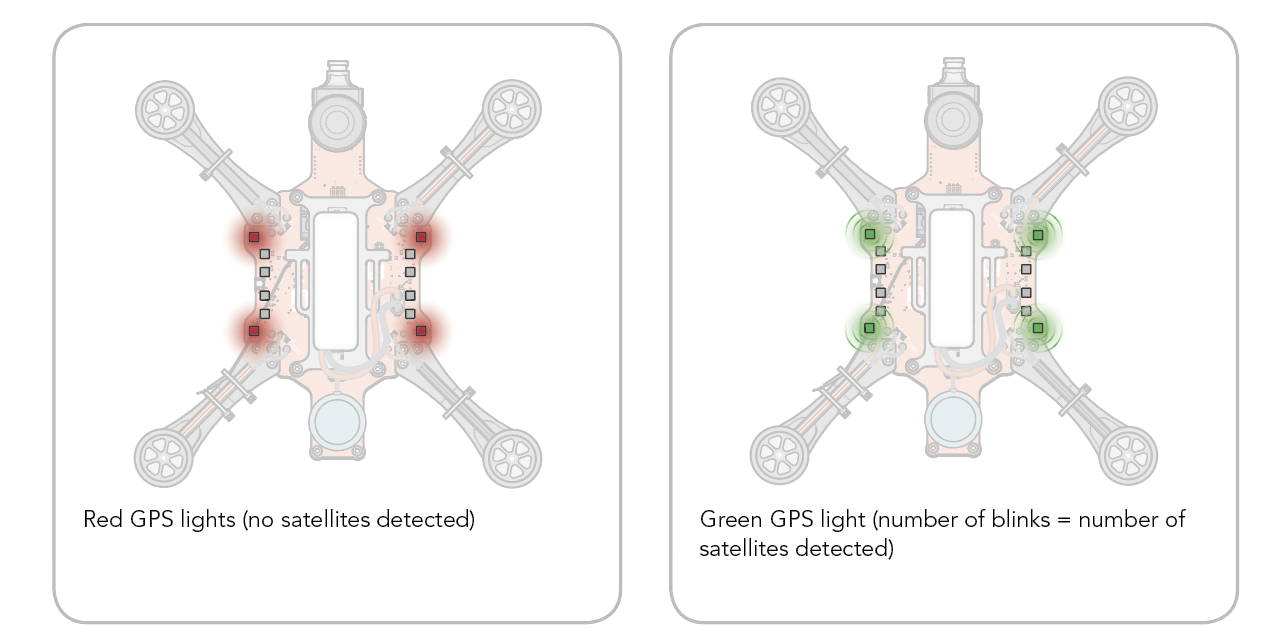
GPS
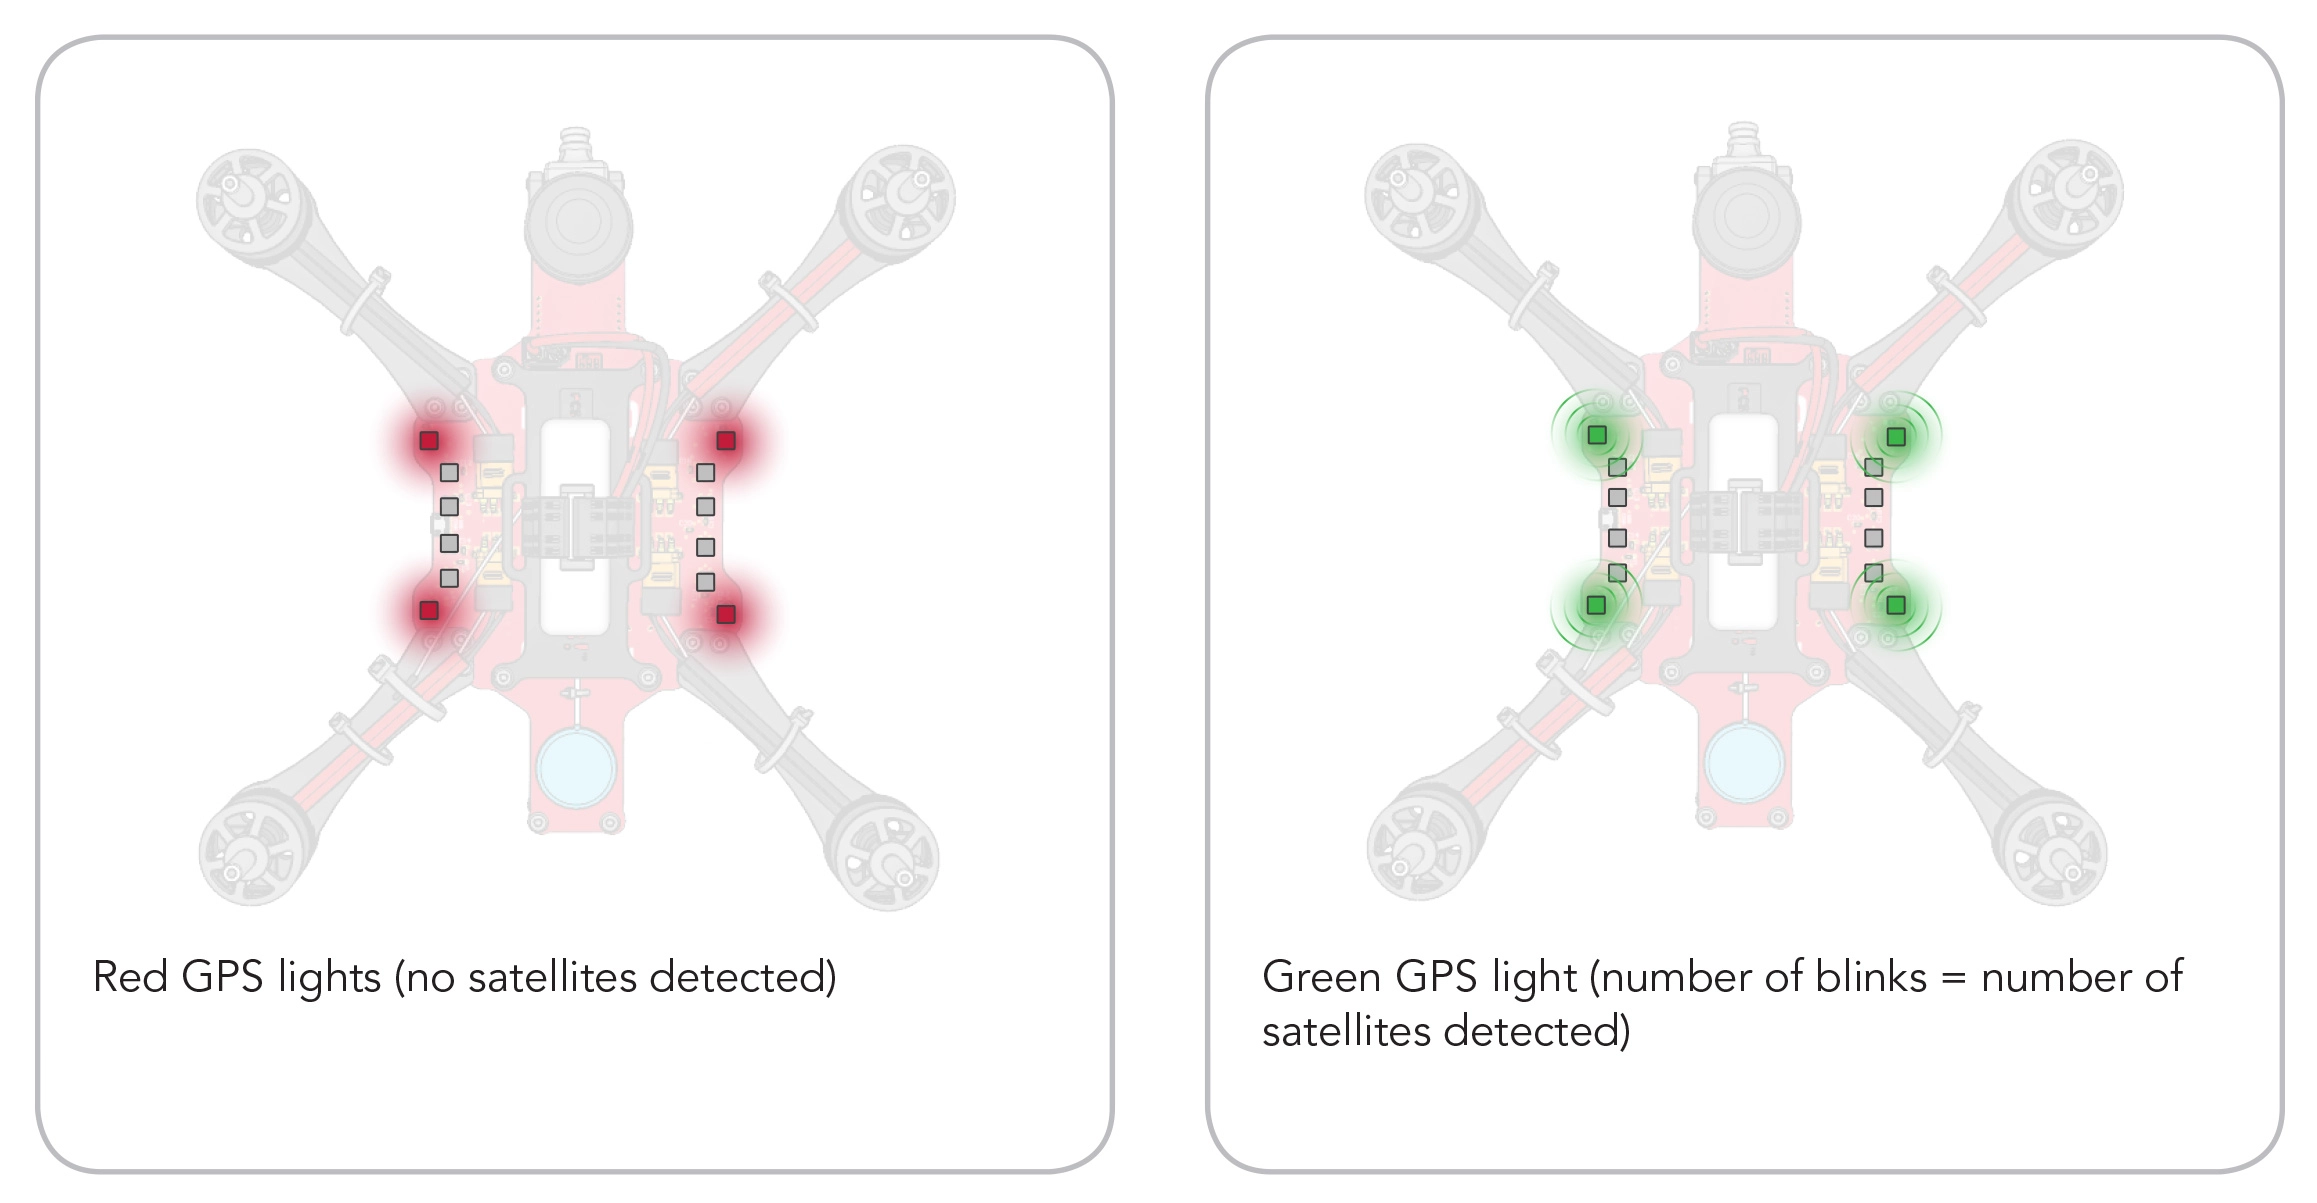
- Red LEDs: No satellites are detected
- Green LEDs: Satellites are detected
- 7 Green Flashes: Ready for 3D Lock
Red LEDs: No Satellites Detected
All four corner LEDs are red. Head outside to an open area clear of trees, buildings and overhangs to be able to fly.
Green LEDs: Connecting to Satellites
Green LEDs mean RubiQ is communicating with satellites. Count the number of flashes from these corner LEDs to learn how many satellites your drone has locked-on to. RubiQ needs to lock onto at least 7 satellites to be able to fly. When RubiQ’s GPS lights have flashed green at least 7 times, listen for her to indicate that 3D lock has been established. This happy tone will only sound if RubiQ is stationary and has locked onto at least 7 satellites. With 3D Lock established, RubiQ is ready for flight.
Depending on the conditions, it may take several minutes to achieve 3D lock.
Arm State
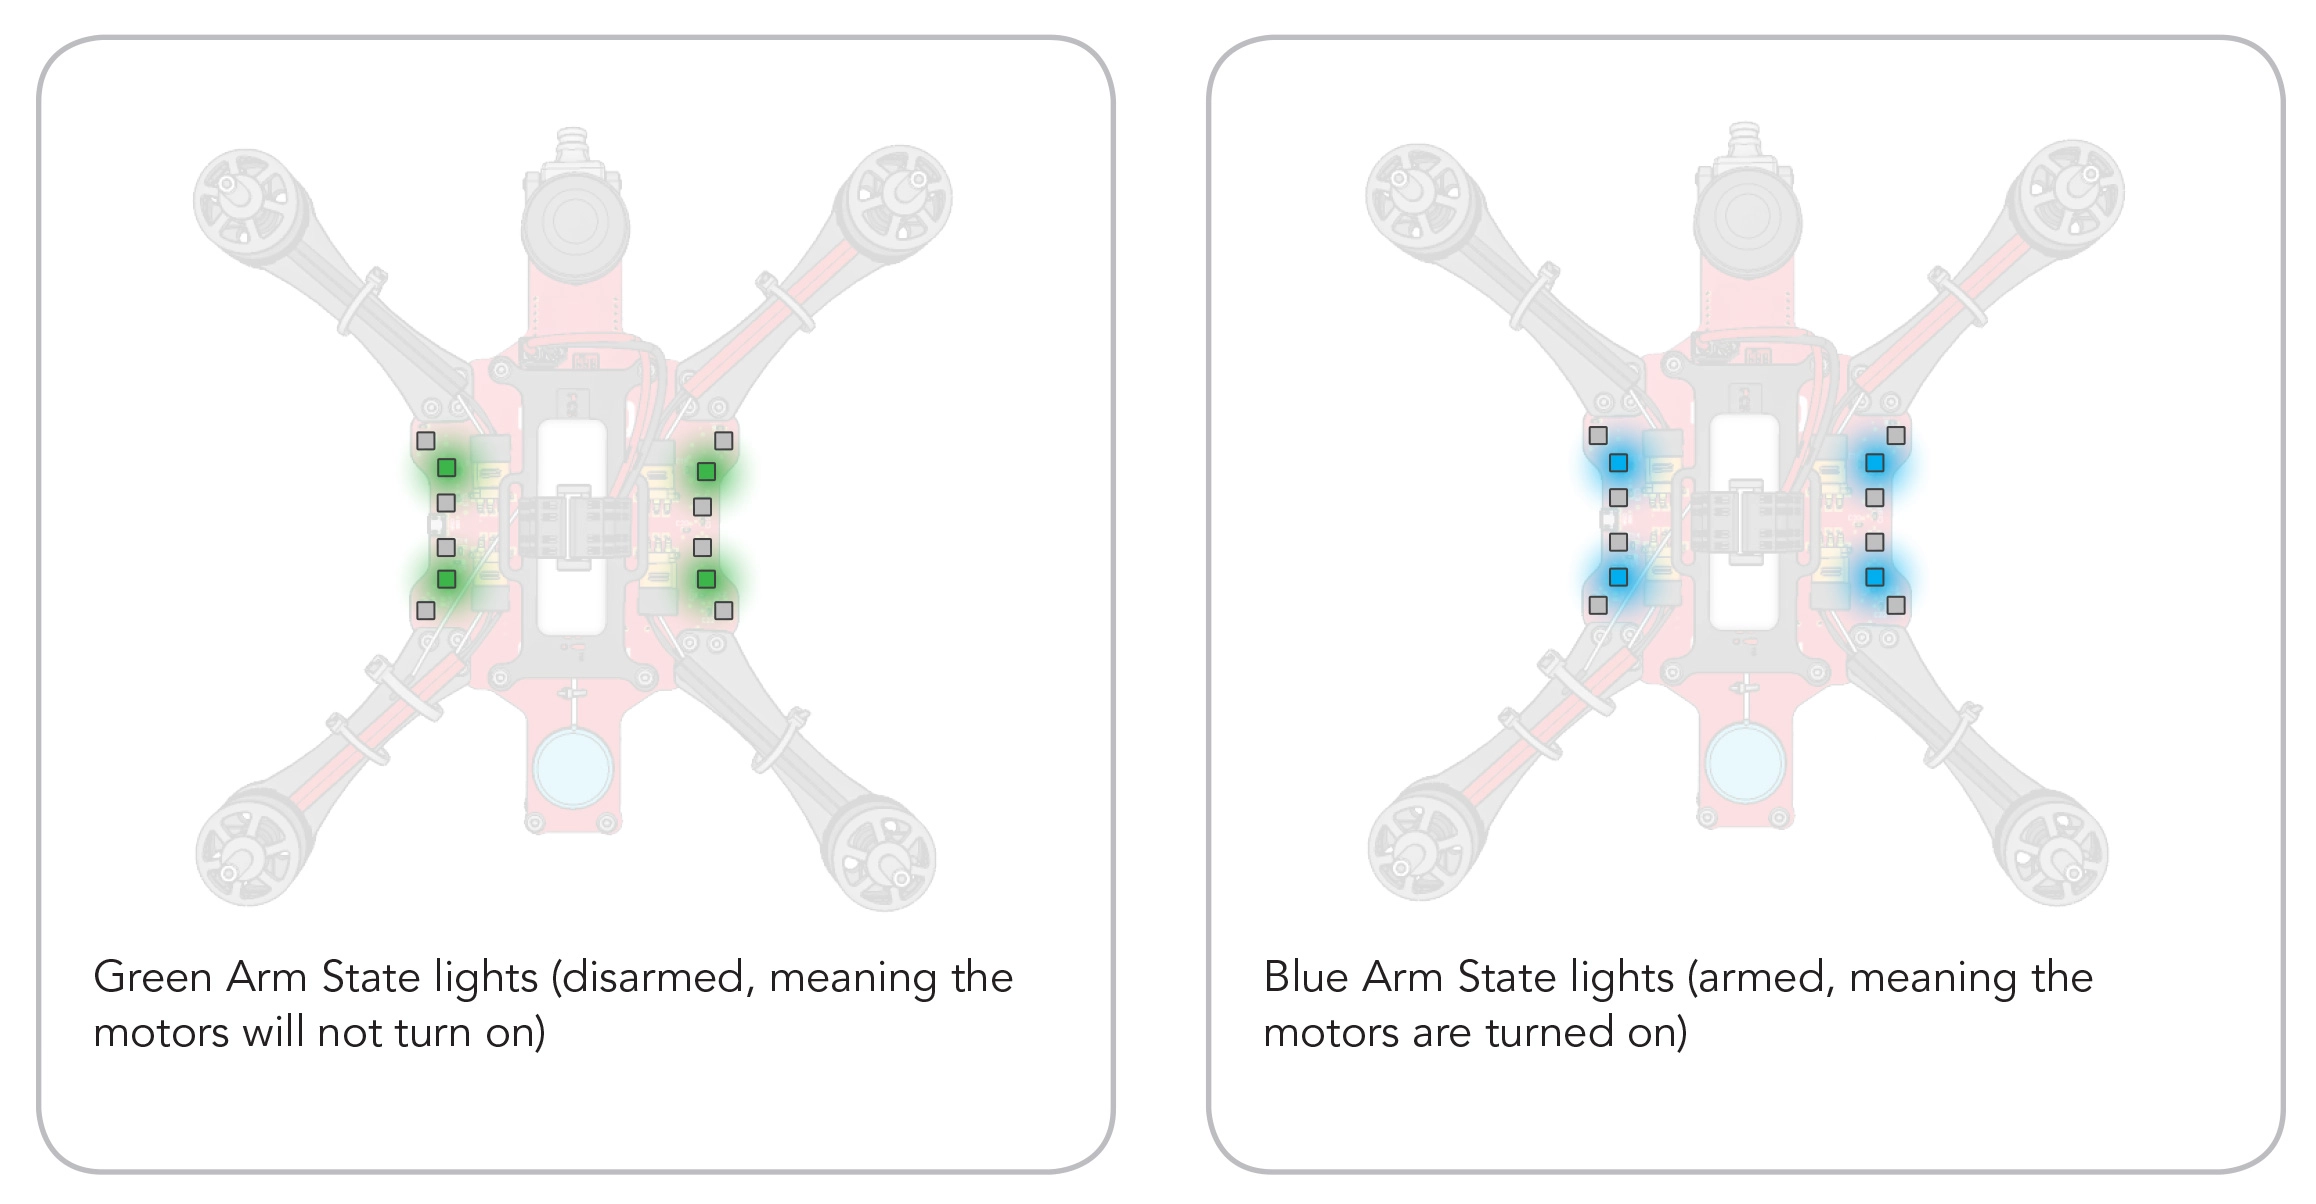
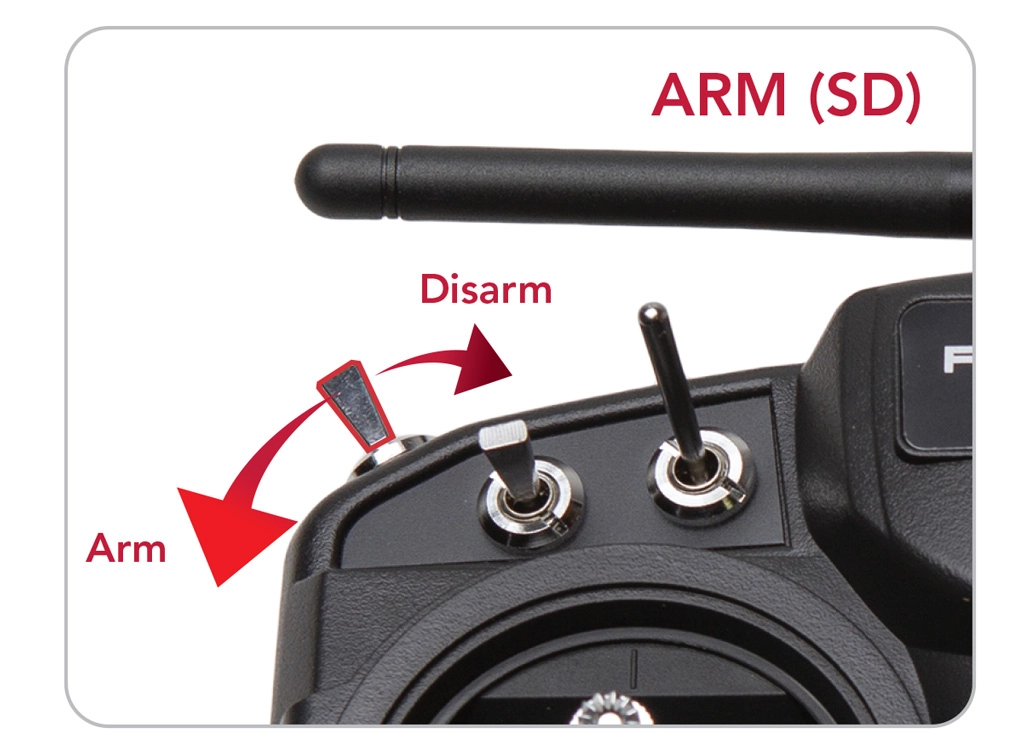
Use the the switch on the Taranis to Arm/Disarm RubiQ.
Green LEDs: Disarmed: When RubiQ is disarmed, the four middle LEDs will show green.
Blue LEDs: Armed: When RubiQ is armed, which can only be achieved after establishing 3D lock, the four middle LED’s will show blue. While armed, RubiQ is ready for flight.
Warnings and Malfunctions
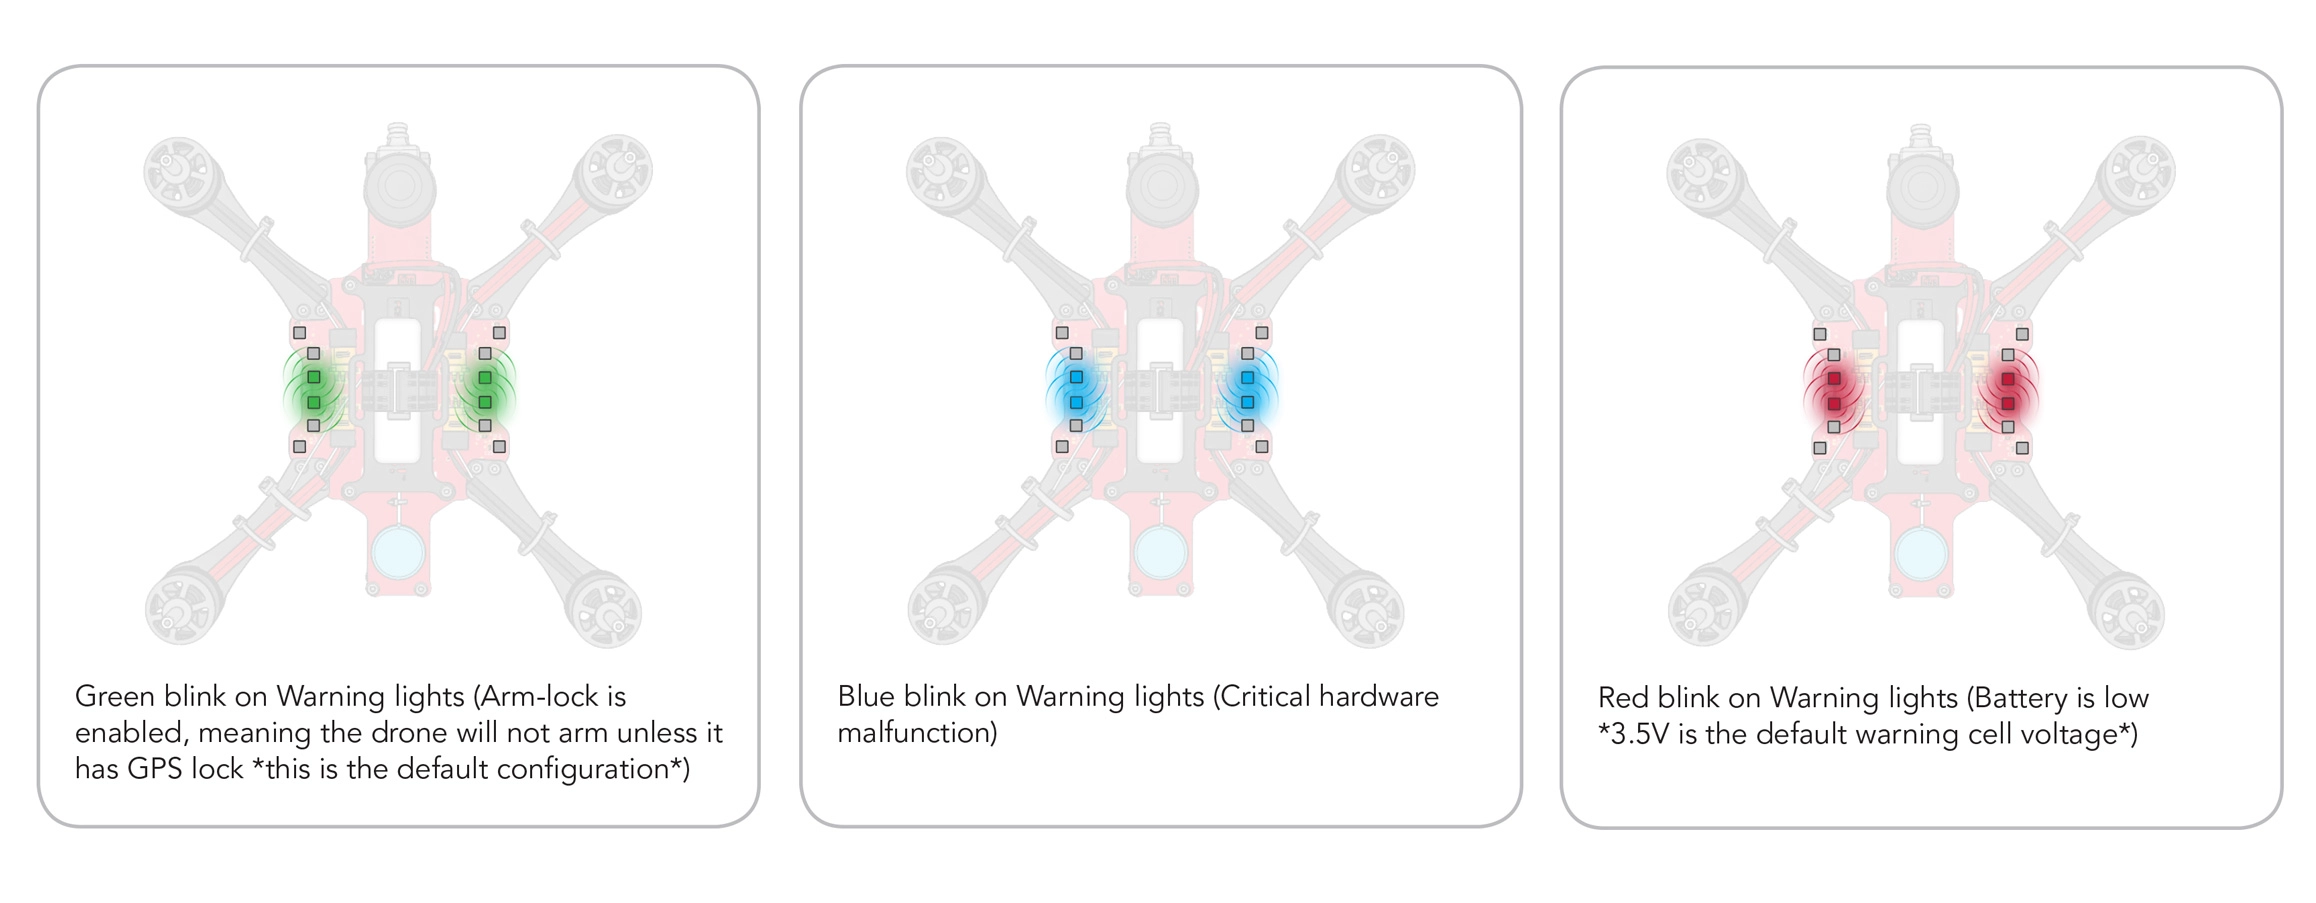
Green LEDs: Arm Lock Enabled
When Arm Lock is enabled, the inner warning lights will flash green. This is good! It means the drone will not Arm unless 3D-lock is established.
Red LEDs: Battery Low
The warning lights will flash Red and be accompanied by a steady beep. This means the battery needs to be charged. Review your accompanying charging instructions to get RubiQ back into the skies.
Look for your warning LEDs to flash red and listen for a steady beep from RubiQ.
Blue LEDs: Critical Hardware Malfunction
If your inner warning lights flash blue, stop flying immediately. Disarm RubiQ, and unplug the battery.
To narrow down your issue, connect RubiQ to the configurator and review the hardware component bar at the top of the page.
If your GPS icon shows red, the issue will generally resolve itself after the battery has been disconnected. If any of the other icons show red, there is likely an issue with the flight controller.
Educators, if the problem persists after reconnecting the battery, please contact us for further assistance.
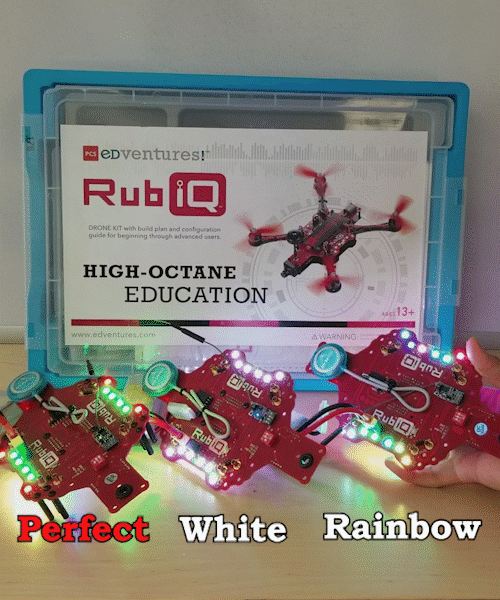
White Lights & Rainbow LEDs
If your LEDs are exhibiting rainbow colors or have gone completely white, then Houston, we have a problem — your PCB or flight controller is malfunctioning and may need to be replaced.
Educators, please contact us for further assistance.
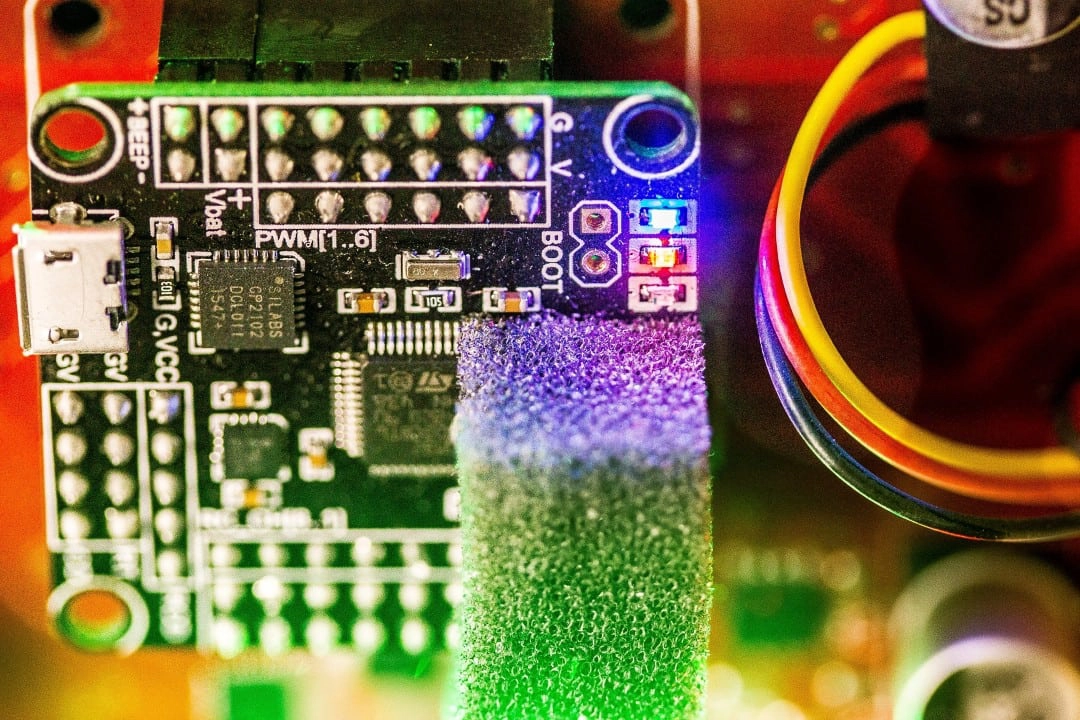
Flight Controller
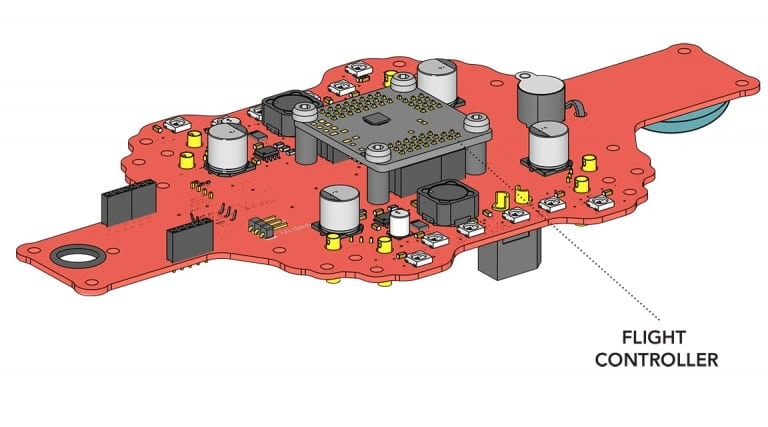
Blue LED: Power On
When the flight controller is receiving power, the LED will show blue.
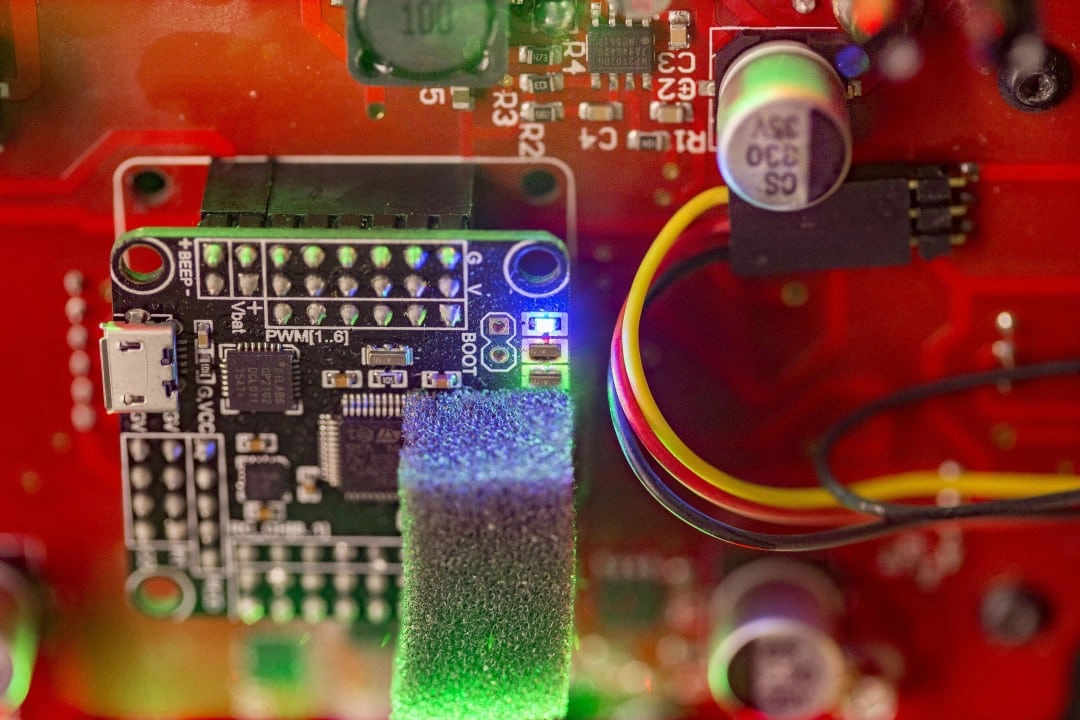
Red LED: Error
If the LED is red, RubiQ is likely not bound to the Taranis or she has lost her connection. Review Step 1 of the Configuration Guide.
Receiver
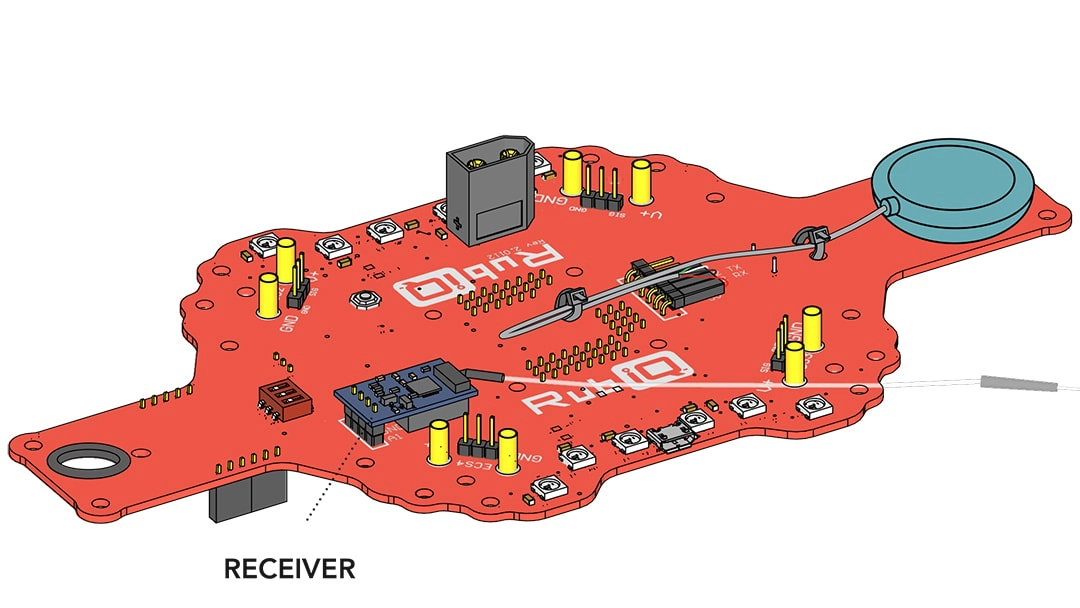
- Blinking LED: Looking for radio controller
- Solid LED: Connected to radio controller
- No LED (with battery plugged in): In binding process
Binding to Radio
At the beginning of the bind process, the receiver LED will blink, as it looks for radio connection.
Once the bind button on the receiver is pressed during the binding process and the battery is inserted, the LED should go dark. This signifies that the receiver has entered bind mode. The LED will remain dark.
After a successful bind, the LED will be solid whenever the radio is powered on and the drone’s battery is connected, showing that the RX is receiving input from the controller.
Not Connected to Radio
When the RX is receiving power but not connected to a radio, the light will blink. This could mean that the drone is bound to a radio that isn’t powered on, or that the drone isn’t yet bound to a radio.